Welcome to my blog. Have a look at the most recent posts below, or browse the tag cloud on the right. An archive of all posts is also available.
During the summer of 1986, I spent a lot of time at the public library in Salem, Oregon. I was between 6th and 7th grade, and I was spending the summer at my mom's. Since my mom and step dad worked all day and had long commutes, I was bored... for hours. The library had two things that drew a young proto-geek: all of the AD&D books and a computer lab.
The computer lab was quite amazing, and it was years ahead of its time. Anyone with a library card could reserve an hour on any of the computers in the lab. There was an Apple IIe, and Apple IIc, an original Apple Macintosh, an IBM PC XT 5160, an IBM PCjr, and some sort of weird "luggable" computer with a tiny amber screen.
I spent a lot of time in that lab. I remember spending hours on using MacPaint creating AD&D character sheets for each kind of character class. When I got tired of "working," I spent a bit of time playing some kind of graphical Rogue clone. I mostly stayed away from the IBM computers because they seemed boring. I did try to play Flight Simulator on the PCjr, but there was no way to turn the sound off, and that almost got me banned from the lab.
Most of my time, however, was spent on the Apple II. This was also the summer that I discovered software piracy. I had a box of Elephant 5¼" floppy discs (an elephant never forgets!) full of l337 warez. I spent hours playing Conan, Hard Hat Mack, Mario Bros, and Bolo (a game sorely in need of a remake). There was one game that stood out above all the rest: Ultima IV.
My parents made sure, from a very young age, that I could read and do arithmetic. I was near the top of my class in both. They did not, however, educate me on logic puzzles or quests. For shame! As a result, I struggled with Ultima. There were so many things to find, so many people to interrogate, and so many dungeons to explore. And you had to behave with virtue (this was also the summer that I discovered Slayer and Metallica). I did not finish that game that summer. In fact, I didn't even come close. I don't think I collected any of the items necessary to finish the game, and I only became four parts Avatar.
In 1987 I lined up at the store to get Ultima Exodus for the NES. My dad and I played that game over, and over, and over. I really enjoyed that game. I really enjoyed the simplifications over the computer version of Ultima IV. Talking to people was so much less tedious! Still, Avatarhood beckoned. By that point, my education in logic puzzles and quests was fully underway. It also helped that by that time I had leared to draw maps of dungeons. I believe that this is a skill much like making wagon wheels. It was really important for a while, but now it's nearly useless.
I didn't get access to a computer again until around the middle of the 8th grade. One of the teachers at my middle school started an after school computer club. Mr Paisley was a math teacher and a Mac geek to the core. He had a Mac SE in his class, and it had a device that went on an overhead projector to project the screen. Even the other math teachers thought that was geeky. As a Mac geek and a teacher, he had all the classic Mac thinking games: Shadowgate, Uninvited, and others. I played a bit of Ultima at computer club, but the Mac games, which we played mostly as a group, were too much of a distraction. I didn't have much computer access after that until my sophomore year of high school.
For whatever reason, when Ultima: Quest of the Avatar came out for the NES in 1990, I didn't play it. My dad and I bought it, and he played it quite a lot. I remember him getting really annoyed whenever I'd drop a spoiler based on my vague recollections. I honestly don't remember why I didn't play that game.
In high school I bought my first computer: an Amiga 500. I never got Ultima for the Amiga. My training continued with Black Crypt, Dungeon Master, and Eye of the Beholder. Most of my time on the Amiga was dedicated to solving the mysteries of sine scrollers, shadebobs, and glenzvectors. That is a tale for another day. I still have EoB, but the others seem to have gone missing over the years.
Years later I converted over to PCs. One day at Fry's Electronics, I came across a pack of CDs of 1,000 games or something. One of the discs contained Ultima I through VI (I think). It was only like $10, so I bought it, and I resumed my quest. College, software projects, this new thing called Linux, and life prevented me from spending significant blocks of time questing. I recall several times restarting because, after a multi-month hiatus, I could not remember where I was or what I was doing. Eventually the quest was abandoned.
Last year while I was traveling in Europe, I bought a copy of Ultima IV for the Sega Master Systemat Game Over? in Amsterdam (a very nice retro game shop!). The seed was planted in the back of my mind to resume the quest. I finally decided to pick it up. Over the summer I found complete, in the box copies of Ultima I and Ultima II for Atari 8-bit at a garage sale. Given the amount these go for on eBay, I've been afraid to put the disks in a system to test.
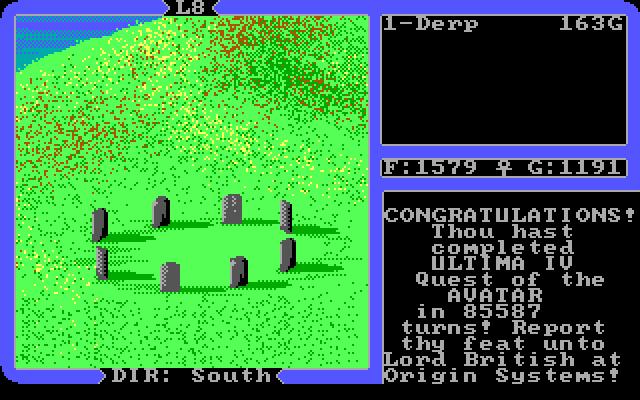
Instead of playing the SMS version, I downloaded it from GoG and played using DOSbox. After about 30 hours of play, I have finally completed a quest over 30 years in the making. It was very, very irritating. Seriously.
That game was amazing and groundbreaking, but many aspects of its design have been improved in the intervening 30+ years. Four aspects stand out in my mind.
Dialog. The dialog in the game is entirely free form. Each NPC has a set of key words that will trigger a response (tip: only the first four characters are checked, so save yourself some typing). After typing
NAME,JOB,MANT,RUNE,SHRI,STON,QUES,MAGI, ... at 100 people, it gets pretty tedious. Doing your taxes kind of tedious. I feel like games have gone a bit too far the other way in modern times. People just spill their guts as soon as you talk to them. I'm not sure what the middle ground would be.Combat. Once you have all eight characters, combat is just a chore. You can't walk through your own characters, even when they're magically asleep, and many of the rooms have twisty, narrow hallways. Add to that rooms full of monsters that cast sleep spells, and you'll want to punch yourself in the face. Have fun on levels 5, 6, and 8 of the Stygian Abyss.
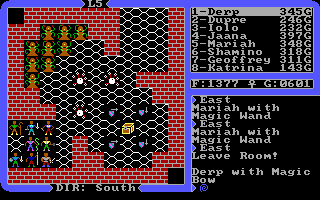
All nine of those Reapers love to cast sleep on the whole party, and the Gazers can put a single character to sleep. On multiple occasions, my entire party was asleep for over a minute. When one of the lazy bums did wake up, it was usually a guy in the back that could neither attck nor cast the "awake" spell on another character.
Secrets. There are many rooms, especially in the Stygian Abyss, that have secret "trigger plates" in the floors. There is no way to know where these are. You just have to step on every tile and watch for something to change in the room. This includes tiles covered with lava. Have fun navigating all of this with eight characters. If one accidentally exits through the wrong exit, everyone has to go out and try the room again.
Magic. This almost didn't make the list, but one aspect really annoys me. Ultima uses a fairly standard system of magic points. It also uses a system where spells require mixtures made of ingredients that must be bought or found. In many ways this is a feature. Talking to people to learn new spell mixtures was fun. The problem is that you can't mix reagents while in combat or combat rooms of dungeons. This includes rooms that are cleared of enemies and rooms that never had enemies. In the Stygian Abyss, there are several long, connected sequences of rooms. Several rooms require use of the "dispel" spell to pass. If you run out of mixtures, you have to go all the way back. This includes having to pass one of the annoying maze rooms with creatures that put your party to sleep.
I enjoyed the game right up until the Stygian Abyss. The game crossed over from fun to pure frustration. The lower levels are filled with rooms that only allow a single character at a time to advance into a position to attack the enemies, and those rooms are invariably filled with enemies that cast sleep spells in the character in front. Once those rooms are cleared, most have invisible floor triggers that must be activated. That is fine, but many of them cause secret doors to appear. The secret doors are noted by a single pixel dot in the brick pattern of the walls. On a low resolution display of 1985, these were easy to pick out. In a 640x400 window on a 2560x1600 display, they're basically invisible. I don't blame Richard Garriot for that one, but it still made things more frustrating.

If I were to play the game again, and in all honesty I probably will, I would do a few things differently.
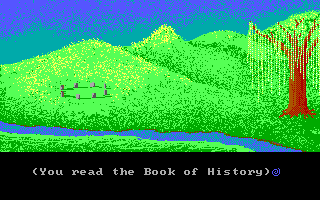
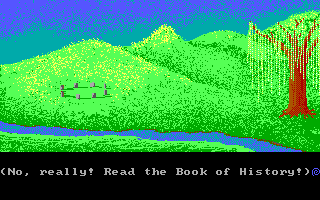
RTFM. The intro sequence tells you to read The History of Britania, but I didn't exactly download that from GOG. There are a lot of things that you don't even know you need to do without the book. In the old days, bits were expensive and paper was cheap. Now bits are basically free, and you can't download paper over the Internet.
I would probably play the Sega Master System version. I think that would save some of the dialog tedium. The trade-off is that I think it would make combat even more irritating. On computer versions, combat commands are selected by different keys on the keyboard. On console versions, combat commands are selected using a menu.
The NES version, apparently, removed a bunch of things. The graphics also look a little too goofy for me to take seriously.
If I played again on the computer, I would use the
normal3xscaling mode in DOSbox. Always check the configuration options of your emulator before you get too into things.Wait until as late as possible to pick up the last few characters. Juggling eight characters around in combat is not fun in any dungeon. You can only have as many characters as the level of your main character. This time around I got my main leveled up pretty quickly and picked up all but the last companion. This has two advantages. First, the core group of characters will be higher level during the final dungeon. Second, a lot less time and irritation will be spent juggling a large party in the earlier dungeons.
Geoffery and Katrina are especially useless. Neither can use magic. Geoffery's strongest ranged weapon is the crossbow, and Katrina's is
Now I have to go play Ultima V...
The slides from my FOSDEM talk are now available.
The video of the talk will eventually be available. It takes a lot of time and hard work to prepare all of the videos. The notes in the slides are probably more coherent that I am in the video. There were a few good questions at the end, so you may want to fast forward to that.
I am planning to post the source for the partial Amiga simulator next week. When I do, I will also have another blog post. Watch this space...
In a previous blog
post
I said, "If you have encountered a regression and you are building a driver
from source, please provide the results of
git-bisect." There is some feeling
that performing a bisect is hard, time consuming, or both. Back in the
bad-old-days, that was true... but git bisect run changed all that.
Most of performing a bisect is mechanical and repetitious:
- Build the project.
- If the build fails, run
git bisect skip. - Run the test.
- Inspect the results.
- Run
git bisect goodorgit bisect baddepending on the test result. - While there are more steps to bisect, repeat from step 1.
- Run
git bisect resetto restore the tree to its original state.
Some years ago, someone noticed that this seems like a task a computer could
do. At least as early as git 1.6.0 (around 2010), this has been possible with
using git bisect run. Once you get the hang of it, it's surprisingly easy
to use.
A Word of Caution
Before actually discussing automated bisects, I want to offer a word of
caution. Bisecting, automated or otherwise, is a process that still requires
the application of common sense. A critical step at the end of bisecting is
manually testing the guilty commit and the commit immediately before the
guilty commit. You should also look at the commit that git-bisect claims is
guilty. Over the years I have seen many bug reports for Mesa that either
point at commits that only change comments in the code or only change a driver
other than the driver on which the bug was observed.
I have observed these failures to have two causes, although other causes may
be possible. With a manual bisect, it is really easy to accidentally git
bisect good when you meant git bisect bad. I have done this by using
up-arrow to go back through the shell command history when I'm too lazy to
type the command again. It's really easy to get the wrong one doing that.
The other cause of failure I have observed occurs when multiple problems occur between the known-good commit and the known-bad commit. In this case the bisect will report a commit that was already know to be bad and was already fixed. This false information can waste a lot of time for the developer who is trying to fix the bug. They will spend time trying to determine why the commit reported by the bisect still causes problems when some other commit is the actual cause. The remedy is proper application of common sense while performing the bisect. It's often not enough to just see that the test case fails. The mode of the failure must also be considered.
Automated Bisect Basics
All of the magic in an automated bisect revolves around a single script that you supply. This script analyzes the commit and tells bisect what to do next. There are four things that the script can tell bisect, and each of them is communicated using the script's return code.
Skip this commit because it cannot be analyzed. This is identical to manually running
git bisect skip.This can be used, for example, if the commit does not build. A script might contain something like:if ! make ; then exit 125 fiAs you might infer from the code example, a return code of 125 instructs bisect to skip the commit.
Accept this commit as good. This is identical to
git bisect good. A return code of 0 instructs bisect to accept the commit as good.Reject this commit as bad. This is identical to
git bisect bad. All tests in the piglit test suite print a string in a specific format when a test passes or fails. This can be used by the script to generate the exit code. For example:bin/arb_clear_buffer_object-null-data -auto > /tmp/result.$$ if grep -q 'PIGLIT: {"result": "pass" }' /tmp/result.$$; then rm /tmp/result.$$ exit 0 else cat /tmp/result.$$ rm /tmp/result.$$ exit 1 fiIn this bit of script, the output of the test is printed in the "bad" case. This can be very useful. Bisects of long ranges of commits may encounter failures unrelated to the failure you are trying to bisect. Seeing the output from the test may alert you to failures with unrelated causes.
Looking for simple "pass" or "fail" output from the test may not be good enough. It may be better to look for specific failure messages from the test. As mentioned above, it is important to only report a commit as bad if it the test fails due to the problem you are trying to bisect.
Imagine a case where a failure in the
arb_clear_buffer_object-null-dataon the master branch is being bisected. The particular failure is an incorrect error being generated, and the known-good commit isHEAD~200when the last stable release occurred (on a different branch with a common root). However,HEAD~110..HEAD~90contain an unrelated rendering error that was fixed inHEAD~89. Sincegit-bisectperforms a binary search, it will testHEAD~100first and see the wrong failure. Simply looking for test failure would incorrectly identifyHEAD~110as the problem commit. If the script instead checked for the specific incorrect error message, the correct guilty commit is more likely to be found.A return code with any value of 1 through 127, excluding 125, instructs bisect to reject the commit as bad.
Stop at this commit and wait for human interaction. This can be used when something really catastrophic happens that requires human attention. Imagine a scenario where the bisect is being performed on one system but tests are run on another. This could be used if the bisect system is unable to communicate wit the test system. A return code with any value of 128 through 255 will halt the bisect.
All of this can be used to generate a variety of scripts for any sort of complex environment. To quote Alan Kay, "Simple things should be simple, complex things should be possible." For a simple make-based project and an appropriately written test case, an automated bisect script could be as simple as:
#!/bin/bash
if ! make ; then
    exit 125
fi
# Use the return code from the test case
exec test_case
Since this is just a script that builds the project and runs a test, you can
easily test the script. Testing the script is a very good idea if you plan to
leave the computer when the bisect starts. It would be shame to leave the
computer for several hours only to find it stuck at the first commit due to a
problem in the automated bisect script. Assuming the script is called
auto_bisect.sh, testing the script can be as easy as:
$ ./auto_bisect.sh ; echo $?
Now all of the human interaction for the entire bisect would be three commands:
    $ git bisect start bad-commit good-commit
    $ git bisect run auto_bisect.sh
    $ git bisect reset
If there are a lot commits in good-commit..bad-commit, building the project
takes a long time, or running the tests takes a long time, feel free to go
have a sandwich while you wait. Or play
Quake. Or do other work.
Broken Builds
The bane of most software developer's existence is a broken build. Few things are more irritating. With GIT, it is possible to have transient build failures that nobody notices. It's not unheard of for a 20 patch series to break at patch 9 and fix at patch 11. This commonly occurs either when people move patches around in a series during development or when reviewers suggest splitting large patches into smaller patches. In either case patch 9 could add a call to a function that isn't added until patch 11, for example. If nobody builds at patch 9 the break goes unnoticed.
The break goes unnoticed until a bisect hits exactly patch 9. If the problem being bisected and the build break are unrelated (and the build break is short lived), the normal skip process is sufficient. The range of commits that don't build will skip. Assuming the commit before the range of commits that don't build and the commit after the range of commits that don't build are both good or bad, the guilty commit will be found.
Sometimes things are not quite so rosy. You are bisecting because there was a problem, after all. Why have just one problem when you can have a whole mess of them? I believe that the glass is either empty or overflowing with steaming hot fail. The failing case might look something like:
    $ git bisect start HEAD HEAD~20
    Bisecting: 9 revisions left to test after this (roughly 3 steps)
    [2d712d35c57900fc0aa0f1455381de48cdda0073] gallium/radeon: move printing texture info into a separate function
    $ git bisect run ./auto_bisect.sh
    running ./auto_bisect.sh
        auto_bisect.sh says skip
    Bisecting: 9 revisions left to test after this (roughly 3 steps)
    [622186fbdf47e4c77aadba3e38567636ecbcccf5] mesa: errors: validate the length of null terminated string
    running ./auto_bisect.sh
        auto_bisect.sh says good
    Bisecting: 8 revisions left to test after this (roughly 3 steps)
    [19eaceb6edc6cd3a9ae878c89f9deb79afae4dd6] gallium/radeon: print more information about textures
    running ./auto_bisect.sh
        auto_bisect.sh says skip
    Bisecting: 8 revisions left to test after this (roughly 3 steps)
    [5294debfa4910e4259112ce3c6d5a8c1cd346ae9] automake: Fix typo in MSVC2008 compat flags.
    running ./auto_bisect.sh
        auto_bisect.sh says good
    Bisecting: 6 revisions left to test after this (roughly 3 steps)
    [1cca259d9942e2f453c65e8d7f9f79fe9dc5f0a7] gallium/radeon: print more info about CMASK
    running ./auto_bisect.sh
        auto_bisect.sh says skip
    Bisecting: 6 revisions left to test after this (roughly 3 steps)
    [c60d49161e3496b9e64b99ecbbc7ec9a02b15a17] gallium/radeon: remove unused r600_texture::pitch_override
    running ./auto_bisect.sh
        auto_bisect.sh says skip
    Bisecting: 6 revisions left to test after this (roughly 3 steps)
    [84fbb0aff98d6e90e4759bbe701c9484e569c869] gallium/radeon: rename fmask::pitch -> pitch_in_pixels
    running ./auto_bisect.sh
        auto_bisect.sh says skip
    Bisecting: 6 revisions left to test after this (roughly 3 steps)
    [bfc14796b077444011c81f544ceec5d8592c5c77] radeonsi: fix occlusion queries on Fiji
    running ./auto_bisect.sh
        auto_bisect.sh says bad
    Bisecting: 5 revisions left to test after this (roughly 3 steps)
    [a0bfb2798d243a4685d6ea32e9a7091fcec74700] gallium/radeon: print more info about HTILE
    running ./auto_bisect.sh
        auto_bisect.sh says skip
    Bisecting: 5 revisions left to test after this (roughly 3 steps)
    [75d64698f0b0c906d611e69d9f8b118c35026efa] gallium/radeon: remove DBG_TEXMIP
    running ./auto_bisect.sh
        auto_bisect.sh says skip
    Bisecting: 5 revisions left to test after this (roughly 3 steps)
    [3a6de8c86ee8a0a6d2f2fbc8cf2c461af0b9a007] radeonsi: print framebuffer info into ddebug logs
    running ./auto_bisect.sh
        auto_bisect.sh says bad
    Bisecting: 3 revisions left to test after this (roughly 2 steps)
    [a5055e2f86e698a35da850378cd2eaa128df978a] gallium/aux/util: Trivial, we already have format use it
    running ./auto_bisect.sh
        auto_bisect.sh says skip
    There are only 'skip'ped commits left to test.
    The first bad commit could be any of:
    19eaceb6edc6cd3a9ae878c89f9deb79afae4dd6
    2d712d35c57900fc0aa0f1455381de48cdda0073
    84fbb0aff98d6e90e4759bbe701c9484e569c869
    c60d49161e3496b9e64b99ecbbc7ec9a02b15a17
    1cca259d9942e2f453c65e8d7f9f79fe9dc5f0a7
    75d64698f0b0c906d611e69d9f8b118c35026efa
    a0bfb2798d243a4685d6ea32e9a7091fcec74700
    a5055e2f86e698a35da850378cd2eaa128df978a
    3a6de8c86ee8a0a6d2f2fbc8cf2c461af0b9a007
    We cannot bisect more!
    bisect run cannot continue any more
In even more extreme cases, the range of breaks can be even longer. Six or seven is about the most that I have personally experienced.
The problem doesn't have to be a broken build. It could be anything that prevents the test case from running. On Mesa I have experienced problems where a bug that prevents one driver from being able to load or create an OpenGL context persists for a few commits. Anything that prevents the test from running (e.g., not produce a pass or fail result) or causes additional, unrelated failures should be skipped.
Usually the problem is something really trivial. If the problem was fixed, a
patch for the problem may even already exist. Let's assume a patch exists in
a file named fix-the-build.patch. We also know that the build broke at
commit 75d6469, and it was fixed at commit 3a6de8c. This means that the
range 75d6469^..3a6de8c^ need the patch applied. If you're not convinced
that the ^ is necessary, observe the log output:
    $ git log --oneline 75d6469^..3a6de8c^
    a0bfb27 gallium/radeon: print more info about HTILE
    1cca259 gallium/radeon: print more info about CMASK
    84fbb0a gallium/radeon: rename fmask::pitch -> pitch_in_pixels
    19eaceb gallium/radeon: print more information about textures
    2d712d3 gallium/radeon: move printing texture info into a separate function
    c60d491 gallium/radeon: remove unused r600_texture::pitch_override
    75d6469 gallium/radeon: remove DBG_TEXMIP
Notice that the bottom commit in the list is the commit where the break is first experienced, and the top commit in the list is not the one where the break is fixed.
Using this information is simple. The bisect script need only determine the current commit is in the list of commits that need the patch and conditionally apply the patch.
    # Get the short-from SHA of the current commit
    SHA=$(git log --oneline HEAD^.. | cut -f1 -d' ')

    # If the current commit is in the list of commits that need the patch
    # applied, do it.  If applying the patch fails, even partially, abort.
    if grep --silent "^$SHA " <(git log --oneline 75d6469^..3a6de8c^)
        #                     ^^                                    ^
        #                     This bit runs git-log, redirects the output
        #                     to a temporary file, then uses that temporary
        #                     file as the input to grep.  Non-bash shells
        #                     will probably need to do all that manually.
        if ! patch -p1 --forward --silent < fix-the-build.patch ; then
            exit 255
        fi
    fi
Before exiting, the script must return the tree to its original state. If it
does not, applying the next commit may fail or applying the patch on the next
step will certainly fail. git-reset
can do most of the work. It just has to be applied everywhere this script
might exit. I generally do this using a wrapper function. The simple bisect
script from before might look like:
    #!/bin/bash
    function report()
    {
        git reset --hard HEAD
        exit $1
    }

    # Get the short-from SHA of the current commit
    SHA=$(git log --oneline HEAD^.. | cut -f1 -d' ')

    # If the current commit is in the list of commits that need the patch
    # applied, do it.  If applying the patch fails, even partially, abort.
    if grep --silent "^$SHA " <(git log --oneline 75d6469^..3a6de8c^)
        if ! patch -p1 --forward --silent < fix-the-build.patch ; then
            # Just exit here... so that we can see what went wrong
            exit 255
        fi
    fi

    if ! make ; then
        report 125
    fi

    # Use the return code from the test case
    test_case
    report $?
This can be extended to any number of patches to fix any number of problems.
There is one other tip here. If the first bisect attempt produced
inconclusive results due to skipped commits, it may not have been wasted
effort. Referring back to the previous output, there were two good commits
found. These commits can be given to the next invocation of git bisect
start. This helps reduce the search space from 9 to 6 in this case.
    $ git bisect start HEAD HEAD~20 622186fbdf47e4c77aadba3e38567636ecbcccf5 5294debfa4910e4259112ce3c6d5a8c1cd346ae9
    Bisecting: 6 revisions left to test after this (roughly 3 steps)
    [1cca259d9942e2f453c65e8d7f9f79fe9dc5f0a7] gallium/radeon: print more info about CMASK
Using the last bad commit can reduce the search even further.
    $ git bisect start 3a6de8c86ee8a0a6d2f2fbc8cf2c461af0b9a007 HEAD~20 622186fbdf47e4c77aadba3e38567636ecbcccf5 5294debfa4910e4259112ce3c6d5a8c1cd346ae9
    Bisecting: 4 revisions left to test after this (roughly 2 steps)
    [2d712d35c57900fc0aa0f1455381de48cdda0073] gallium/radeon: move printing texture info into a separate function
Note that git-bisect does not emit "good" or "bad" information. You have to
author your bisect script to emit that information. The report function is
a good place to do this.
    function report()
    {
        if [ $1 -eq 0 ]; then
            echo "    auto_bisect.sh says good"
        elif [ $1 -eq 125 ]; then
            echo "    auto_bisect.sh says skip"
        else
            echo "    auto_bisect.sh says bad"
        fi

        git reset --hard HEAD
        exit $1
    }
Remote Test Systems
Running tests on remote systems pose additional challenges. At the very least, there are three additional steps: get the built project on the remote system, start test on the remote system, and retrieve the result.
For these extra steps, rsync and
ssh are powerful tools. There
are numerous blog posts and tutorials dedicated to using rsync and ssh in
various environments, and duplicating that effort is well beyond the scope of
this post. However, there is one couple nice feature relative to automated
bisects that is worth mentioning.
Recall that returning 255 from the script will cause the bisect
to halt waiting for human intervention. It just so happens that ssh returns
255 when an error occurs. Otherwise it returns the result of the remote
command. To make use of this, split the work across two scripts instead of
putting all of the test in a single auto_bisect.sh script. A new
local_bisect.sh contains all of the commands that run on the build / bisect
system, and remote_bisect.sh contains all of the commands that run on the
testing system.
remote_bisect.sh should (only) execute the test and exit with the same sort
of return code as auto_bisect.sh would. local_bisect.sh should build the
project, copy the build to the testing system, and start the test on the
testing system. The return code from remote_bisect.sh should be directly
returned from local_bisect.sh. A simple local_bisect.sh doesn't look too
different from auto_bisect.sh:
    #!/bin/bash
    if ! make ; then
        exit 125
    fi

    if ! rsync build_results tester@test.system.com:build_results/; then
        exit 255
    fi

    # Use the return code from the test case
    exec ssh tester@test.system.com /path/to/test/remote_bisect.sh
Since remote_bisect.sh returns "normal" automated bisect return codes and
ssh returns 255 on non-test failures, everything is taken care of.
Interactive Test Cases
Automated bisecting doesn't work out too well when the test itself cannot be
automated. There is still some benefit to be had from automating the process.
Optionally applying patches, building the project, sending files to remote
systems, and starting the test can all still be automated, and I think
"automated" applies only very loosely. When the test is done, the script
should exit with a return code of 255. This will halt the
bisect. Run git bisect good or git bisect bad. Then, run git bisect run
./auto_bisect.sh again.
It's tempting to just run auto_bisect.sh by hand and skip git bisect run.
The small advantage to the later is that skipping build failures will still be
automated.
Going further requires making an interactive test case be non-interactive. For developers of OpenGL drivers, it is common to need to bisect rendering errors in games. This can be really, really painful and tedious. Most of the pain comes from the task not being automatable. Just loading the game and getting to the place where the error occurs can often take several minutes. These bugs are often reported by end-users who last tested with the previous release. From the 11.0 branch point to the 11.1 branch point on Mesa there were 2,308 commits.
    $ git bisect start 11.1-branchpoint 11.0-branchpoint
    Bisecting: 1153 revisions left to test after this (roughly 10 steps)
    [bf5f931aee35e8448a6560545d86deb35f0639b3] nir: make nir_instrs_equal() static
When you realized that bisect will be 10 steps with at least 10 to 15 minutes
per step, you may begin to feel your insides die. It's even worse if you
accidentally type git bisect good when you meant git bisect bad along the
way.
This is a common problem testing interactive applications. A variety of tools
exist to remove the interactivity from interactive applications.
apitrace is one such tool. Using apitrace,
the OpenGL commands from the application can be recorded. This step must be
done manually. The resulting trace can then be run at a known good commit,
and an image can be captured from the portion of the trace that would exhibit
the bug. This step must also be done manually, but the image capture is
performed by a command line option to the trace replay command. Now a script
can reply the trace, collect a new image, and compare the new image with the
old image. If the images match, the commit is good. Otherwise, the commit is
bad. This can be error prone, so it's a good idea to keep all the images from
the bisect. A human can then examine all the images after the bisect to make
sure the right choice were made at each commit tested.
A full apitrace tutorial is beyond the scope of this post. The apitrace
documentation
has some additional information about using apitrace with automated bisects.
What Now?
git-bisect is an amazingly powerful tool. Some of the more powerful aspects
of GIT get a bad rap for being hard to use
correctly: make one mistake, and you'll have to
re-clone your tree. With even the more powerful aspects of git-bisect, such
as automated bisects, it's actually hard to go wrong. There are two
absolutely critical final tips. First, remember that you're bisecting. If
you start performing other GIT commands in the middle of the bisect, both you
and your tree will get confused. Second, remember to reset your tree using
git bisect reset when you're done. Without this step, you'll still be
bisecting, so see the first tip. git-bisect and automated bisects really
make simple things simple and complex things possible.
Yesterday I pushed an implementation of a new OpenGL extension
GL_EXT_shader_samples_identical
to Mesa. This extension will be in the Mesa 11.1 release in a few
short
weeks,
and it will be enabled on various Intel platforms:
- GEN7 (Ivy Bridge, Baytrail, Haswell): Only currently effective in the fragment shader. More details below.
- GEN8 (Broadwell, Cherry Trail, Braswell): Only currently effective in the vertex shader and fragment shader. More details below.
- GEN9 (Skylake): Only currently effective in the vertex shader and fragment shader. More details below.
The extension hasn't yet been published in the official OpenGL extension registry, but I will take care of that before Mesa 11.1 is released.
Background
Multisample anti-aliasing (MSAA) is a well known technique for reducing aliasing effects ("jaggies") in rendered images. The core idea is that the expensive part of generating a single pixel color happens once. The cheaper part of determining where that color exists in the pixel happens multiple times. For 2x MSAA this happens twice, for 4x MSAA this happens four times, etc. The computation cost is not increased by much, but the storage and memory bandwidth costs are increased linearly.
Some time ago, a clever person noticed that in areas where the whole pixel is covered by the triangle, all of the samples have exactly the same value. Furthermore, since most triangles are (much) bigger than a pixel, this is really common. From there it is trivial to apply some sort of simple data compression to the sample data, and all modern GPUs do this in some form. In addition to the surface that stores the data, there is a multisample control surface (MCS) that describes the compression.
On Intel GPUs, sample data is stored in n separate planes. For 4x MSAA, there are four planes. The MCS has a small table for each pixel that maps a sample to a plane. If the entry for sample 2 in the MCS is 0, then the data for sample 2 is stored in plane 0. The GPU automatically uses this to reduce bandwidth usage. When writing a pixel on the interior of a polygon (where all the samples have the same value), the MCS gets all zeros written, and the sample value is written only to plane 0.
This does add some complexity to the shader compiler. When a shader executes
the texelFetch
function, several things happen behind the scenes. First, an instruction is
issued to read the MCS. Then a second instruction is executed to read the
sample data. This second instruction uses the sample index and the result of
the MCS read as inputs.
A simple shader like
    #version 150
    uniform sampler2DMS tex;
    uniform int samplePos;

    in vec2 coord;
    out vec4 frag_color;

    void main()
    {
       frag_color = texelFetch(tex, ivec2(coord), samplePos);
    }
generates this assembly
    pln(16)         g8<1>F          g7<0,1,0>F      g2<8,8,1>F      { align1 1H compacted };
    pln(16)         g10<1>F         g7.4<0,1,0>F    g2<8,8,1>F      { align1 1H compacted };
    mov(16)         g12<1>F         g6<0,1,0>F                      { align1 1H compacted };
    mov(16)         g16<1>D         g8<8,8,1>F                      { align1 1H compacted };
    mov(16)         g18<1>D         g10<8,8,1>F                     { align1 1H compacted };
    send(16)        g2<1>UW         g16<8,8,1>F
                                sampler ld_mcs SIMD16 Surface = 1 Sampler = 0 mlen 4 rlen 8 { align1 1H };
    mov(16)         g14<1>F         g2<8,8,1>F                      { align1 1H compacted };
    send(16)        g120<1>UW       g12<8,8,1>F
                                sampler ld2dms SIMD16 Surface = 1 Sampler = 0 mlen 8 rlen 8 { align1 1H };
    sendc(16)       null<1>UW       g120<8,8,1>F
                                render RT write SIMD16 LastRT Surface = 0 mlen 8 rlen 0 { align1 1H EOT };
The ld_mcs instruction is the read from the MCS, and the ld2dms is the
read from the multisample surface using the MCS data. If a shader reads
multiple samples from the same location, the compiler will likely eliminate
all but one of the ld_mcs instructions.
Modern GPUs also have an additional optimization. When an application clears a surface, some values are much more commonly used than others. Permutations of 0s and 1s are, by far, the most common. Bandwidth usage can further be reduced by taking advantage of this. With a single bit for each of red, green, blue, and alpha, only four bits are necessary to describe a clear color that contains only 0s and 1s. A special value could then be stored in the MCS for each sample that uses the fast-clear color. A clear operation that uses a fast-clear compatible color only has to modify the MCS.
All of this is well documented in the Programmer's Reference Manuals for Intel GPUs.
There's More
Information from the MCS can also help users of the multisample surface reduce memory bandwidth usage. Imagine a simple, straight forward shader that performs an MSAA resolve operation:
    #version 150
    uniform sampler2DMS tex;

    #define NUM_SAMPLES 4 // generate a different shader for each sample count

    in vec2 coord;
    out vec4 frag_color;

    void main()
    {
        vec4 color = texelFetch(tex, ivec2(coord), 0);

        for (int i = 1; i < NUM_SAMPLES; i++)
            color += texelFetch(tex, ivec2(coord), i);

        frag_color = color / float(NUM_SAMPLES);
    }
The problem should be obvious. On most pixels all of the samples will have the same color, but the shader still reads every sample. It's tempting to think the compiler should be able to fix this. In a very simple cases like this one, that may be possible, but such an optimization would be both challenging to implement and, likely, very easy to fool.
A better approach is to just make the data available to the shader, and that
is where this extension comes in. A new function textureSamplesIdenticalEXT
is added that allows the shader to detect the common case where all the
samples have the same value. The new, optimized shader would be:
    #version 150
    #extension GL_EXT_shader_samples_identical: enable
    uniform sampler2DMS tex;

    #define NUM_SAMPLES 4 // generate a different shader for each sample count

    #if !defined GL_EXT_shader_samples_identical
    #define textureSamplesIdenticalEXT(t, c)  false
    #endif

    in vec2 coord;
    out vec4 frag_color;

    void main()
    {
        vec4 color = texelFetch(tex, ivec2(coord), 0);

        if (! textureSamplesIdenticalEXT(tex, ivec2(coord)) {
            for (int i = 1; i < NUM_SAMPLES; i++)
                color += texelFetch(tex, ivec2(coord), i);

            color /= float(NUM_SAMPLES);
        }

        frag_color = color;
    }
The intention is that this function be implemented by simply examining the MCS
data. At least on Intel GPUs, if the MCS for a pixel is all 0s, then all the
samples are the same. Since textureSamplesIdenticalEXT can reuse the MCS
data read by the first texelFetch call, there are no extra reads from
memory. There is just a single compare and conditional branch. These added
instructions can be scheduled while waiting for the ld2dms instruction to
read from memory (slow), so they are practically free.
It is also tempting to use textureSamplesIdenticalEXT in conjunction with
anyInvocationsARB (from
GL_ARB_shader_group_vote).
Such a shader might look like:
    #version 430
    #extension GL_EXT_shader_samples_identical: require
    #extension GL_ARB_shader_group_vote: require
    uniform sampler2DMS tex;

    #define NUM_SAMPLES 4 // generate a different shader for each sample count

    in vec2 coord;
    out vec4 frag_color;

    void main()
    {
        vec4 color = texelFetch(tex, ivec2(coord), 0);

        if (anyInvocationsARB(!textureSamplesIdenticalEXT(tex, ivec2(coord))) {
            for (int i = 1; i < NUM_SAMPLES; i++)
                color += texelFetch(tex, ivec2(coord), i);

            color /= float(NUM_SAMPLES);
        }

        frag_color = color;
    }
Whether or not using anyInvocationsARB improves performance is likely to be
dependent on both the shader and the underlying GPU hardware. Currently Mesa
does not support
GL_ARB_shader_group_vote,
so I don't have any data one way or the other.
Caveats
The implementation of this extension that will ship with Mesa 11.1 has a three main caveats. Each of these will likely be resolved to some extent in future releases.
The extension is only effective on scalar shader units. This means on GEN7 it
is effective in fragment shaders. On GEN8 and GEN9 it is only effective in
vertex shaders and fragment shaders. It is supported in all shader stages,
but in non-scalar stages textureSamplesIdenticalEXT always returns false.
The implementation for the non-scalar stages is slightly different, and, on
GEN9, the exact set of instructions depends on the number of samples. I
didn't think it was likely that people would want to use this feature in a
vertex shader or geometry shader, so I just didn't finish the implementation.
This will almost certainly be resolved in Mesa 11.2.
The current implementation also returns a false negative for texels fully set
to the fast-clear color. There are two problems with the fast-clear color.
It uses a different value than the "all plane 0" case, and the size of the
value depends on the number of samples. For 2x MSAA, the MCS read returns
0x000000ff, but for 8x MSAA it returns 0xffffffff.
The first problem means the compiler would needs to generate additional instructions to check for "all plane 0" or "all fast-clear color." This could hurt the performance of applications that either don't use a fast-clear color or, more likely, that later draw non-clear data to the entire surface. The second problem means the compiler would needs to do state-based recompiles when the number of samples changes.
In the end, we decided that "all plane 0" was by far the most common case, so we have ignored the "all fast-clear color" case for the time being. We are still collecting data from applications, and we're working on several uses of this functionality inside our driver. In future versions we may implement a heuristic to determine whether or not to check for the fast-clear color case.
As mentioned above, Mesa does not currently support
GL_ARB_shader_group_vote.
Applications that want to use textureSamplesIdenticalEXT on Mesa will
need paths that do not use anyInvocationsARB for at least the time being.
Future
As stated by issue #3, the extension still needs to gain SPIR-V support. This extension would be just as useful in Vulkan and OpenCL as it is in OpenGL.
At some point there is likely to be a follow-on extension that provides more
MCS data to the shader in a more raw form. As stated in issue #2 and
previously in this post, there are a few problems with providing raw MCS data.
The biggest problem is how the data is returned. Each sample count needs a
different amount of data. Current 8x MSAA surfaces have 32-bits (returned)
per pixel. Current 16x MSAA MCS surfaces have 64-bits per pixel. Future 32x
MSAA, should that ever exist, would need 192 bits. Additionally, there would
need to be a set of new texelFetch functions that take both a sample index
and the MCS data. This, again, has problems with variable data size.
Applications would also want to query things about the MCS values. How many times is plane 0 used? Which samples use plane 2? What is the highest plane used? There could be other useful queries. I can imagine that a high quality, high performance multisample resolve filter could want all of this information. Since the data changes based on the sample count and could change on future hardware, the future extension really should not directly expose the encoding of the MCS data. How should it provide the data? I'm expecting to write some demo applications and experiment with a bunch of different things. Obviously, this is an open area of research.
In the old days, there were not a lot of users of open-source 3D graphics drivers. Aside from a few ID Software games, tuxracer, and glxgears, there were basically no applications. As a result, we got almost no bug reports. It was a blessing and a curse.
Now days, thanks to Valve Software and Steam, there are more applications than you can shake a stick at. As a result, we get a lot of bug reports. It is a blessing and a curse.
There's quite a wide chasm between a good bug report and a bad bug report. Since we have a lot to do, the quality of the bug report can make a big difference in how quickly the bug gets fixed. A poorly written bug report may get ignored. A poorly written bug may require several rounds asking for more information or clarifications. A poorly written bug report may send a developer looking for the problem in the wrong place.
As someone who fields a lot of these reports for Mesa, here's what I look for...
Submit against the right product and component. The component will determine the person (or mailing list) that initially receives notification about the bug. If you have a bug in the Radeon driver and only people working Nouveau get the bug e-mail, your bug probably won't get much attention.
If you have experienced a bug in 3D rendering, you want to submit your bug against Mesa.
Selecting the correct component can be tricky. It doesn't have to be 100% correct initially, but it should be close enough to get the attention of the right people. A good first approximation is to pick the component that matches the hardware you are running on. That means one of the following:
- Any modern Intel GPU: Drivers/DRI/i965
- Old Intel GPUs like i915, i945, G33, or Pineview: Drivers/DRI/i915
- Any modern NVIDIA GPU: Drivers/DRI/nouveau.
- Any modern Radeon GPU: Either Drivers/Gallium/radeonsi or Drivers/Gallium/r600.
If you're not sure what GPU is in your system, the command
glxinfo | grep
"OpenGL renderer string"
will help.Correctly describe the software on your system. There is a field in bugzilla to select the version where the bug was encountered. This information is useful, but it is more important to get specific, detailed information in the bug report.
Provide the output of
glxinfo | grep "OpenGL version string". There may be two lines of output. That's fine, and you should include both.If you are using the drivers supplied by your distro, include the version of the distro package. On Fedora, this can be determined by
rpm -q mesa-dri-drivers. Other distros use other commands. I don't know what they are, but Googling for "how do i determine the version of an installed package on " should help.If you built the driver from source using a Mesa release tarball, include the full name of that tarball.
If you built the driver from source using the Mesa GIT repository, include SHA of the commit used.
Include the full version of the kernel using
uname -r. This isn't always important, but it is sometimes helpful.
Correctly describe the hardware in your system. There are a lot of variations of each GPU out there. Knowing exactly which variation exhibited bad behavior can help find the problem.
Provide the output of
glxinfo | grep "OpenGL renderer string". As mentioned above, this is the hardware that Mesa thinks is in the system.Provide the output of
lspci -d ::0300 -nn. This provides the raw PCI information about the GPU. In some cases this maybe more detailed (or just plain different) than the output fromglxinfo.Provide the output of
grep "model name" /proc/cpuinfo | head -1. It is sometimes useful to know the CPU in the system, and this provides information about the CPU model.
Thoroughly describe the problem you observed. There are two goals. First, you want the person reading the bug report to know both what did happen and what you expected to happen. Second, you want the person reading the bug report to know how to reproduce the problem you observed. The person fielding the bug report may not have access to the application.
If the application was run from the command line, provide the full command line used to run the application.
If the application is a test that was run from piglit, provide the command line used to run the test, not the command line used to run piglit. This information is in the piglit
results.jsonresult file.If the application is game or other complex application, provide any necessary information needed to reproduce the problem. Did it happen at specific location in a level? Did it happen while performing a specific operation? Does it only happen when loading certain data files?
Provide output from the application. If the application is a test case, provide the text output from the test. If this output is, say, less than 5 lines, include it in the report. Otherwise provide it as an attachment. Output lines that just say "Fail" are not useful. It is usually possible to run tests in verbose mode that will provide helpful output.
If the application is game or other complex application, try to provide a screenshot. If it is possible, providing a "good" and "bad" screenshot is even more useful. Bug #91617 is a good example of this.
If the bug was a GPU or system hang, provide output from
dmesgas an attachment to the bug. If the bug is not a GPU or system hang, this output is unlikely to be useful.
Add annotations to the bug summary. Annotations are parts of the bug summary at the beginning enclosed in square brackets. The two most important ones are
regressionandbisected(see the next item for more information aboutbisected). If the bug being reported is a new failure after updating system software, it is (most likely) a regression. Adding[regression]to the beginning of the bug summary will help get it noticed! In this case you also must, at the very least, tell us what software version worked... with all the same details mentioned above.The other annotations used by the Intel team are short names for hardware versions. Unless you're part of Intel's driver development team or QA team, you don't really need to worry about these. The ones currently in use are:
SKL- Skylake / GEN9BDW- Broadwell / GEN8BSW- Brasswell / lower power GEN8HSW- Haswell / GEN7.5BYT- Baytrail / lower power GEN7. There may still be some bugs withVLV. This is from the older Valleyview name.IVB- Ivy Bridge / GEN7SNB- Sandy Bridge / GEN6ILK- Ironlake / GEN5GM45- Eaglelake / GEN4.5GEN4ori965or965gmor similar - Broadwater / Crestline / GEN4PNVori915ori945- GEN3
Bisect regressions. If you have encountered a regression and you are building a driver from source, please provide the results of git-bisect. We really just need the last part: the guilty commit. When this information is available, add
bisectedto the tag. This should look like[regression bisected].Note: If you're on a QA team somewhere, supplying the bisect is a practical requirement.
Respond to the bug. There may be requests for more information. There may be requests to test patches. Either way, developers working on the bug need you to be responsive. I have closed a lot of bugs over the years because the original reporter didn't respond to a question for six months or more. Sometimes this is our fault because the question was asked months (or even years) after the bug was submitted.
The general practice is to change the bug status to
NEEDINFOwhen information or testing is requested. After providing the requested information, please change the status back to eitherNEWorASSIGNEDor whatever the previous state was.It is also general practice to leave bugs in the
NEWstate until a developer actually starts working on it. When someone starts work, they will change the "Assigned To" field and change the status toASSIGNED. This is how we prevent multiple people from duplicating effort by working on the same bug.If the bug was encountered in a released version and the bug persists after updating to a new major version (e.g., from 10.6.2 to 11.0.1), it is probably worth adding a comment to the bug "Problem still occurs with ." That way we know you're alive and still care about the problem.
Here is a sample script that collects a lot of information request. It does
not collect information about the driver version other than the glxinfo
output. Since I don't know whether you're using the distro driver or building
one from source, there really isn't any way that my script could do that.
You'll want to customize it for your own needs.
echo "Software versions:"
echo -n "    "
uname -r
echo -n "    "
glxinfo 2>&1 | grep "OpenGL version string"
echo

echo "GPU hardware:"
echo -n "    "
glxinfo 2>&1 | grep "OpenGL renderer string"
echo -n "    "
lspci -d ::0300 -nn
echo

echo "CPU hardware:"
echo -n "    "
uname -m
echo -n "    "
grep "model name" /proc/cpuinfo | head -1 | sed 's/^[^:]*: //'
echo
This generates nicely formatted output that you can copy-and-paste directly into a bug report. Here is the output from my system:
Software versions:
    4.0.4-202.fc21.x86_64
    OpenGL version string: 3.0 Mesa 11.1.0-devel

GPU hardware:
    OpenGL renderer string: Mesa DRI Intel(R) HD Graphics 5500 (Broadwell GT2)
    00:02.0 VGA compatible controller [0300]: Intel Corporation Broadwell-U Integrated Graphics [8086:1616] (rev 09)

CPU hardware:
    x86_64
    Intel(R) Core(TM) i7-5600U CPU @ 2.60GHz
I've been into retro-gaming for a couple years now, and, after the 30th anniversary of the Amiga, I've been getting into retro-computing too. To feed my dirty habbit, I've been doing quite a bit of garage sale hunting. Last weekend I went to a garage sale that advertised on craigslist as "HUGE HOARDER SALE". It did not disappoint. There were a bunch of Atari 7800 games in boxes, so that by itself was worth the trip.
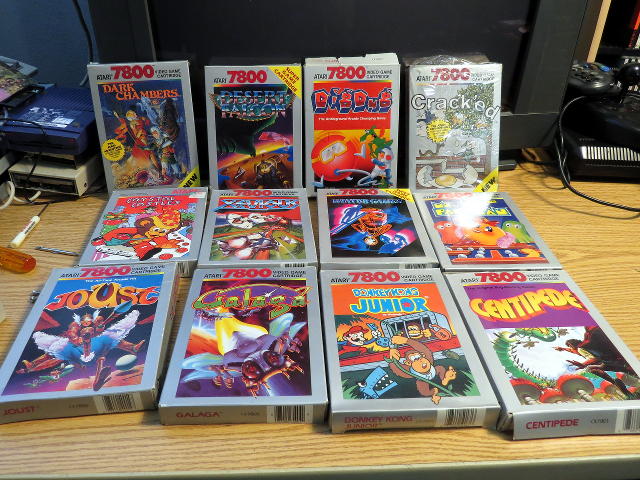
I talked to the guy a bit. He told me there was more stuff inside, but he hadn't had a chance to go through it yet. He did want to, "sell an $80 game for $3." Fair enough. A little more chatting, and he offered to let me have a look. The games were almost all common stuff, but there was a Mega Man IV, in the box... I told him to look up a price for that one, and I still got a really good deal.
The rest of the house... OMG. It really was like you see on TV. Boxes covering almost every inch of the floor and stacked to the ceiling in places. The guy told me that he thought it would take about two years to get the place fully cleaned out. Ouch.
In the kitchen (obviously) there was a big, big pile of computers. I started looking through that... and there was some weird stuff there. The most interesting bits were an Osborne 1, a Mac SE/30, and a DaynaFile.
I first saw the DaynaFile from this view, and I thought, "An external SCSI chasis. I can use that."
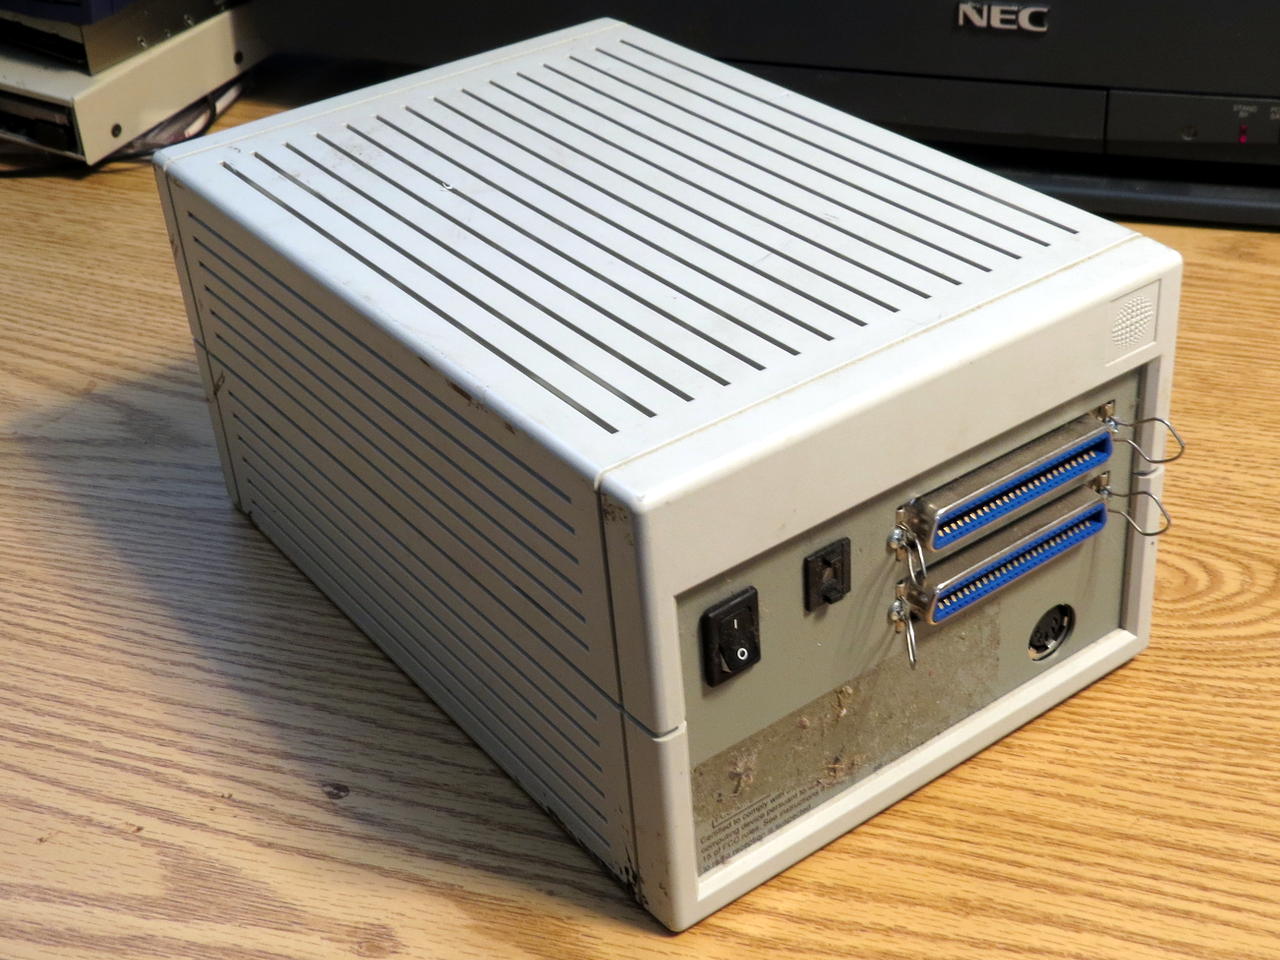
I picked up, turned it around, and almost dropped it. First of all, that's a 5.25" floppy drive in a SCSI chasis. That earns some serious WTF marks alone. Look closer... 360k.
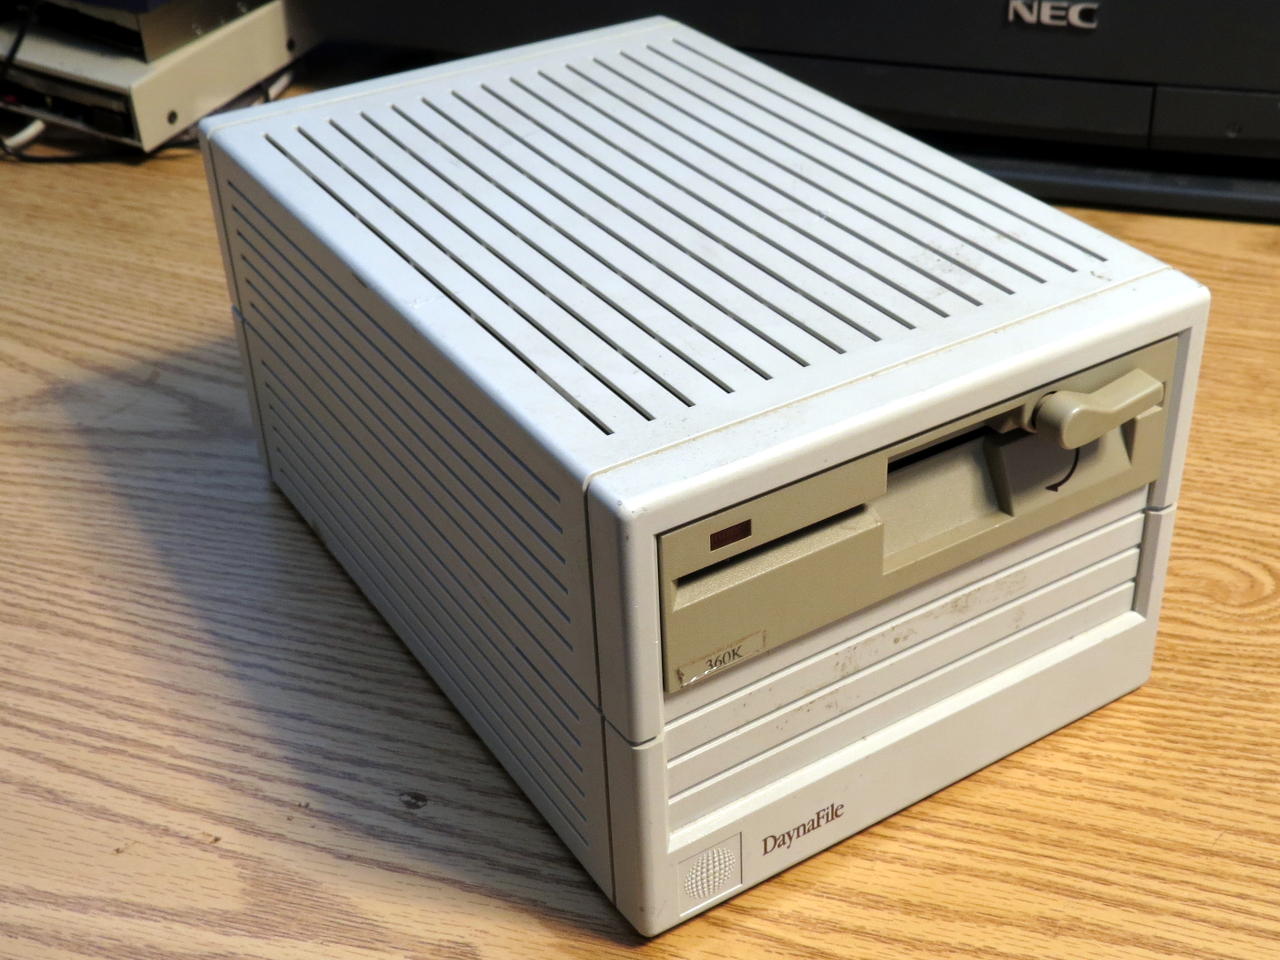
Now I had to have it.  I added it to my pile. I figured that after
amortizing the total price over all the things I got, I paid about $1 for it.
I added it to my pile. I figured that after
amortizing the total price over all the things I got, I paid about $1 for it.
Upon getting it home, I dissected it. Inside is a perfectly ordinary 360k 5.25" floppy drive.
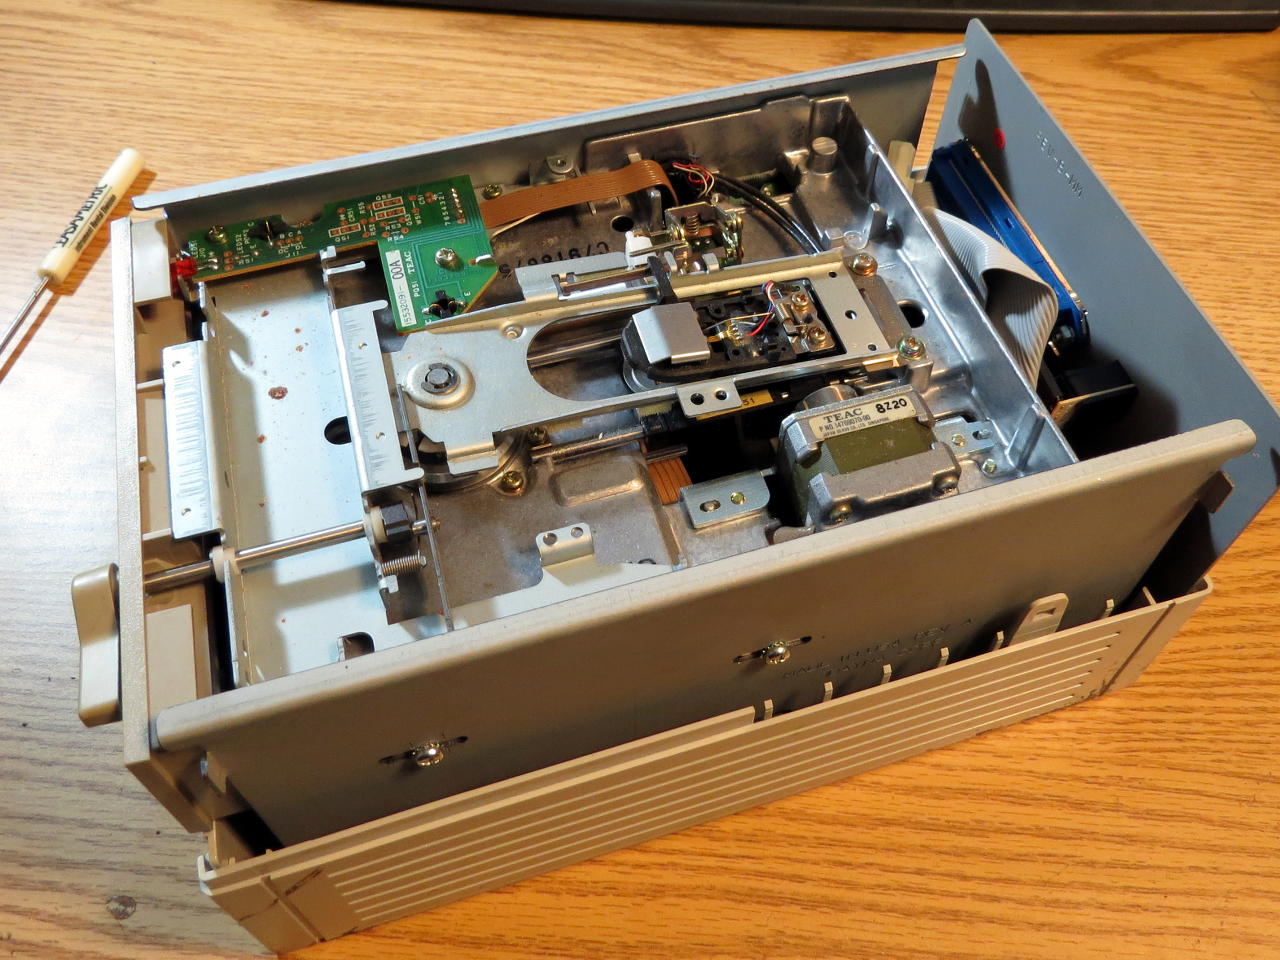
The whole thing is controlled by a little 8031 microcontroller that bridges the SCSI bus to the floppy bus.
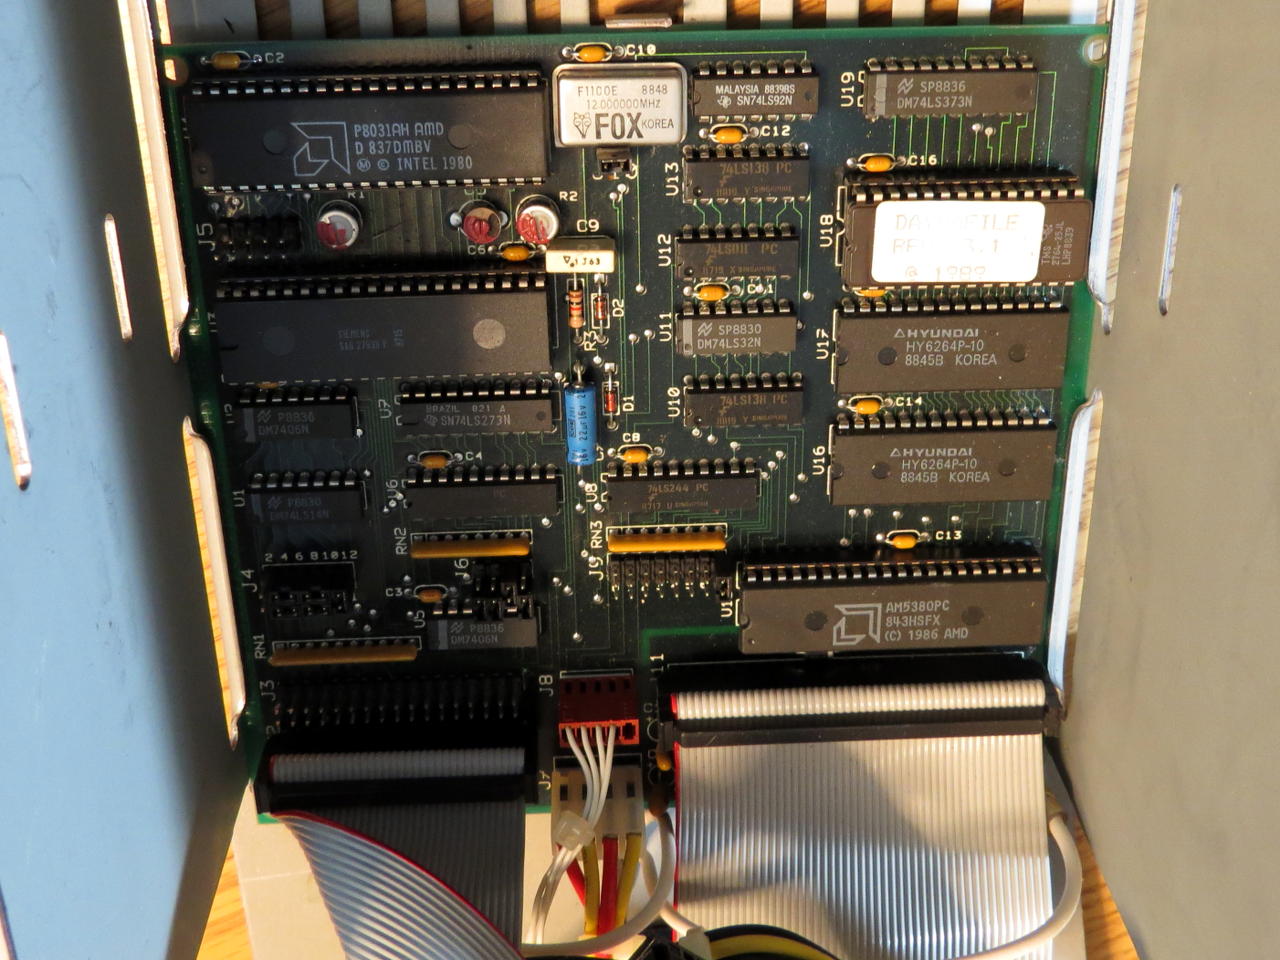
As if the whole thing weren't crazy enough... there's the date on the ROM. It's hard to read in the picture, but it says, "DAYNAFILE REV. 3.1 @ 1989". Yes... 1989. Why? WHY?!? Why did someone need a 360k 5.25" SCSI floppy drive in 1989?!? By that time Macs, Amigas, Atari STs, and even most PCs had 720k 3.5" floppy drives standard in 1989. I understand wanting to read 1.2M 5.25" PC floppies or 1.44M/720k 3.5" PC floppies on a Mac, but 360k? For shame!
The bummer is that there's no powersupply for it. I found a user manual, which is filled with some serious lolz. '"Reading and writing files" is MS-DOS terminology.... Reading a file is the same as opening a document and writing a file is the same as closing a document and saving changes." Now I remember why I used to make fun of Macintosh users.
What the manual doesn't have anywhere in it's 122 pages is a pinout of the powersupply connector. The Internet says it uses an Elpac WM220... should be possible to rig something up.
I just finished my talk at XDC 2014. The short version: UBO support in OpenGL drivers is terrible, and I have the test cases to prove it.
There are slides, a white paper, and, eventually, a video.
UPDATE: Fixed a typo in the white paper reported by Jonas Kulla on Twitter.
UPDATE: Direct link to video.
On Saturday I went to the Seattle Retro Gaming Expo. It was fun (as usual), and I spent too much money (also as usual). On Sunday I rolled up my sleeves, and I started working on a game for a retro system. I've been talking about doing this for at least a year, but it was hard to find time while I was still working on my masters degree. Now that I'm done with that, I have no excuses.
Since this is my first foray (back) into game programming on hella old hardware, I decided to stick with a system I know and a game I know. I'm doing Tetris for the TI-99/4a. Around 1997 I did a version of Tetris in 8051 assembly, and the TI is the first computer that I ever really programmed.
My stepdad used to work at Fred Meyer in the 80's, and he got the computer
practically for free when TI discontinued them... and retailers heavily
discounted their stock-on-hand. It was a few years until the "kids" were
allowed to play with the computer. Once I got access, I spent basically all
of the wee hours of the night hogging the TV and the computer. It was
around that same time that my older stepsister swiped the tape drive, so I
had no way to save any of my work. I would often leave it on for days
while I was working on a program. As a result, I don't have any of those
old programs. It's probably better this way... all of those programs were
spaghetti BASIC garbage.
The cool thing (if that's the right phrase) about starting with the TI is that it uses the TMS9918 VDC. This same chip is used in the ColecoVision, MSX, and Sega SG-1000 (system before the system before the Sega Master System). All the tricks from the TI will directly apply to those other systems.
Fast forward to the present... This first attempt is also in BASIC, but I'm using TI Extended BASIC now. This has a few features that should make things less painful, but I'm pretty sure this will be the only thing I make using the actual TI as the development system... I'm basically writing code using ed (but worse), and I had repressed the memories of how terrible that keyboard is.
On Sunday, for the first time in 28 years, I saved and restored computer data on audio cassette.
Anyway... my plan is:
- Get Tetris working. Based on a couple hours hacking around on Sunday, I don't think BASIC is going to be fast enough for the game.
- Redo parts in assembly, which I can call from TI Extended BASIC, so that the game is playable.
- Maybe redo the whole thing in assembly... dunno.
- Move on to the next game.
I really want to do a version of Dragon Attack. The MSX has the same VDC, so it should be possible. Funny thing there... In 1990 I worked for HAL America (their office was on Cirrus Drive in Beaverton) as a game counselor. I mostly helped people with Adventures of Lolo and Adventures of Lolo 2. Hmm... maybe I should just port Lolo (which also started on the MSX) to the TI...
The slides and video of my talk from Steam Dev Days has been posted. It's basically the Haswell refresh (inside joke) of my SIGGRAPH talk from last year.

The slides from my FOSDEM talk are now available.
This wiki is powered by ikiwiki.